RV Leveling Systems: Manual vs Auto Showdown for Real RVers
Picture this: you’ve just pulled into a beautiful campsite after six hours of driving, ready to kick back with a cold one and watch the sunset. But your RV leveling is so off that your wine glass slides right off the table. Trust me, we’ve been there.
After months of dealing with wonky refrigerators, marbles rolling to one corner, and that annoying feeling that you’re sleeping on a slope, we finally dove deep into understanding RV leveling systems. What we discovered might surprise you – especially if you’re weighing the costs and benefits like we were.
Today, we’re sharing everything we’ve learned about manual leveling blocks versus automatic leveling jacks. No sales pitch here, just real talk from folks who’ve made their share of leveling mistakes and learned the hard way what actually works for weekend warriors like us.
Why RV Leveling Matters More Than You Think
Before we jump into the manual versus auto RV leveling showdown, let’s talk about why this stuff actually matters. It’s not just about comfort, though that’s certainly part of it.
First off, your refrigerator. Most RV fridges are absorption units that need to be relatively level to work properly. We learned this the expensive way when our fridge started acting up during a two-week trip through Colorado. Turns out, being off-level by just a couple degrees can cause serious damage over time.
Then there’s the practical stuff. Doors that won’t stay open, water pooling in your shower, and trying to cook breakfast on a tilted stovetop gets old fast. Plus, if you’re like us and enjoy a good night’s sleep, being level makes a huge difference in comfort.
Most importantly, though, is safety and equipment longevity. Your RV’s frame, appliances, and systems are designed to operate level. Chronic unlevel parking can lead to premature wear and expensive repairs down the road.
Manual RV Leveling: The Old-School Approach
Let’s start with manual leveling, because that’s where most of us begin our RV journey. Manual RV leveling typically involves some combination of blocks, boards, and a good bubble level.
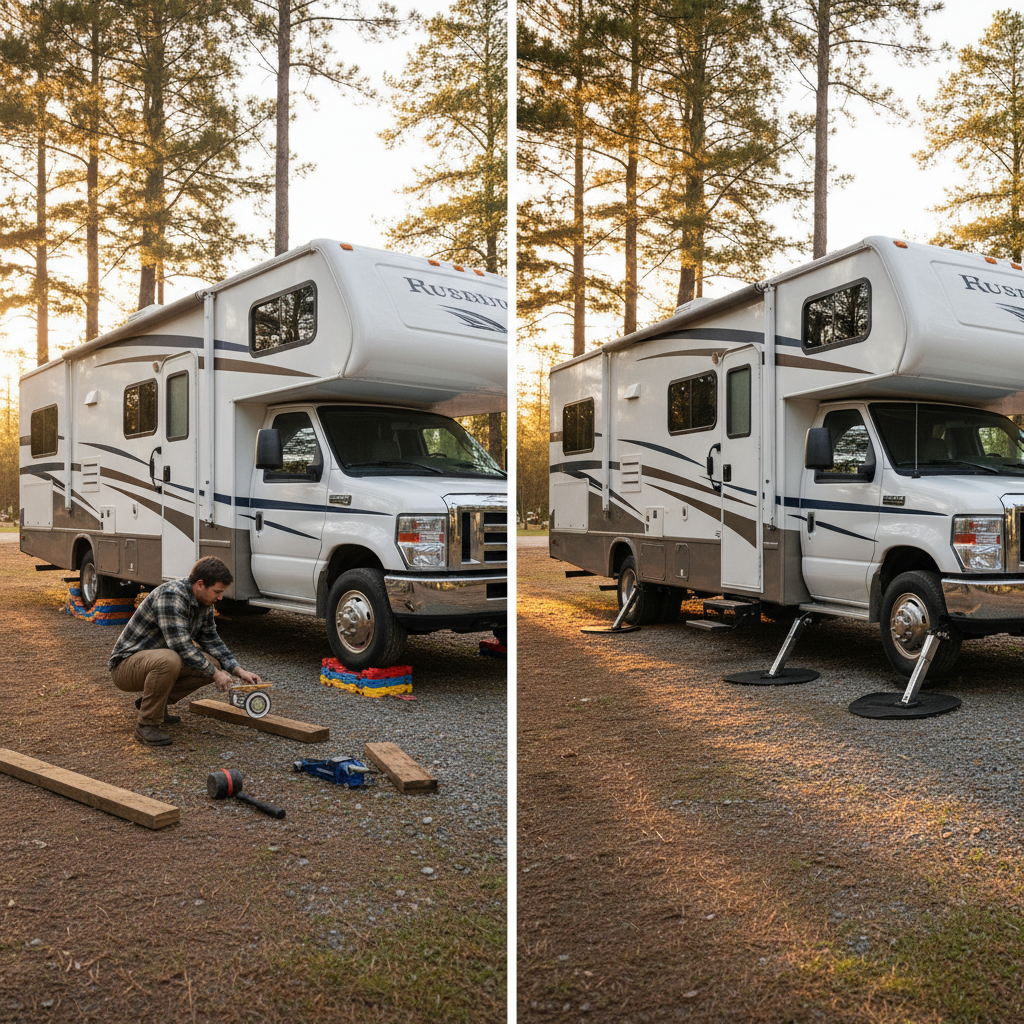
The Basic Manual Setup
When we started RVing, we went with the classic approach: a set of plastic leveling blocks, some 2×8 boards, and a small bubble level. The process is pretty straightforward – you unhook, check your level, back onto blocks as needed, and fine-tune with your tongue jack and stabilizers.
The plastic blocks are lightweight, stack easily, and won’t break the bank. We picked up our first set for about $30, and they lasted us through dozens of camping trips. The key is getting blocks that interlock securely – nothing ruins your day like having a stack collapse while you’re backing up.
For more significant leveling needs, we keep a few pressure-treated 2×8 boards on hand. They’re heavier than blocks but give you more flexibility for really uneven sites. Just remember to bring a small folding saw if you’re particular about custom lengths.
The Reality of Manual Leveling
Here’s the honest truth about manual leveling: it works, but it takes practice and patience. Expect to spend 15-30 minutes getting set up, especially when you’re learning. There’s definitely a learning curve to judging how many blocks you need before you back up.
We’ve had our share of “almost got it” moments where we’re one block too high or too low. The key is taking your time and not being afraid to pull forward and try again. It’s part of the RV experience, but it can test your patience after a long driving day.
The biggest advantage? Cost and simplicity. Your manual leveling gear costs under $100, rarely breaks, and doesn’t add any complexity to your rig. When you’re just getting started or working within a tight RV budget, manual leveling makes perfect sense.
Auto-Leveling: The Push-Button Solution
Now let’s talk about the fancy stuff – automatic RV leveling systems. These systems use hydraulic or electric jacks to level your RV at the push of a button. Sounds magical, right? Well, it kind of is, but like most magic tricks, there’s more than meets the eye.
How Auto-Leveling Actually Works
Most auto-leveling systems work by extending jacks at each corner (and sometimes the middle) of your RV. The system uses sensors to determine level and adjusts the jacks accordingly. The whole process typically takes 3-5 minutes once you’re parked.
There are two main types: hydraulic and electric. Hydraulic systems are faster and more powerful, while electric systems are quieter and often less expensive to maintain. Both do the same job, but hydraulic tends to be the gold standard for larger rigs.
The best systems also include automatic retraction when you’re ready to move, plus safety features that prevent you from driving with the jacks extended. Trust us, that last feature is worth its weight in gold – we’ve seen the aftermath of someone forgetting to retract their jacks.
The Auto-Leveling Experience
When auto-leveling works well, it’s genuinely life-changing. Pull into your site, push a button, grab a beverage, and you’re level in minutes. No crawling under the RV, no stacking blocks, no multiple attempts to get it right.
However, and this is a big however, auto-leveling systems aren’t foolproof. They can struggle with really uneven ground, they add complexity to your rig, and when they break, you’re often looking at expensive repairs and potentially being stuck until you can get service.
We’ve met several RVers who’ve had their auto-leveling systems fail during extended trips. Most carry manual backup equipment for this reason. It’s not that the systems are unreliable per se, but they are complex mechanical systems with sensors, pumps, and moving parts.
Cost Breakdown: What You’re Really Looking At
Let’s talk numbers, because this is where the rubber meets the road for most of us. The cost difference between manual and auto RV leveling is significant, but it’s not just about the upfront investment.
Manual Leveling Costs
A complete manual leveling setup runs about $75-150, depending on how fancy you get. Our basic kit includes plastic blocks ($30), bubble levels ($15), a small hydraulic jack for emergencies ($40), and some 2×8 boards ($25). That’s under $125 for everything.
Maintenance costs are minimal – maybe replacing worn blocks every few years or getting new boards if they split. Over five years of RVing, we’ve spent less than $200 total on manual leveling equipment.
Auto-Leveling System Costs
This is where things get interesting. A factory-installed auto-leveling system typically adds $3,000-$8,000 to your RV purchase price. Aftermarket installation can range from $2,500-$6,000 depending on your rig size and system complexity.
But wait, there’s more. Maintenance and repairs on auto systems can be costly. Hydraulic pump replacements run $500-1,200. Control module issues can cost $300-800 to fix. And if you need emergency road service to retract stuck jacks, you’re looking at several hundred dollars minimum.
Over a ten-year ownership period, you might spend $1,000-2,000 on maintenance and repairs for an auto-leveling system. That’s on top of the initial investment.
Reliability and Real-World Performance
Here’s where we get into the nitty-gritty of daily RV life. Both systems work, but they each have their quirks and limitations.
When Manual Leveling Shines
Manual systems are incredibly reliable because they’re simple. Blocks don’t have electrical components to fail or hydraulic seals to leak. They work in all weather conditions and don’t care about your battery level or 12V system health.
Manual leveling also gives you complete control. You can take your time, make small adjustments, and work around obstacles like tree roots or rocks. We’ve leveled on sites where auto systems would have struggled due to ground conditions.
The learning curve is real, though. It took us probably 20 camping trips to get really efficient at manual leveling. Even now, we occasionally misjudge and have to make adjustments.
Auto-Leveling Performance
When auto-leveling works, it’s incredibly convenient. Fast setup means more time enjoying your destination and less time wrestling with equipment. For folks with mobility issues or back problems, this convenience can be genuinely life-changing.
However, auto systems can be finicky about ground conditions. Soft ground, significant slopes, or obstacles can cause problems. We’ve talked to RVers who’ve had their systems get confused by uneven ground and either refuse to level or make multiple unsuccessful attempts.
Cold weather can also affect hydraulic systems, making them slower or less responsive. And if your coach battery is low, electric systems might not function properly.
Which System Makes Sense for Different RV Lifestyles
The right choice really depends on your specific situation and RV lifestyle. After talking to dozens of RVers and living with both systems, here’s our take on who should consider what.
Manual Leveling Makes Sense If:
You’re new to RVing and shopping for your first RV. Learning on manual systems teaches you important skills and keeps costs down while you figure out what you really need.
You’re weekend warriors who camp 10-20 nights per year. The time savings of auto-leveling might not justify the cost and complexity for occasional use.
You frequently camp in primitive or boondocking situations where reliability matters more than convenience.
You enjoy the hands-on aspect of RVing and don’t mind the physical setup process.
Auto-Leveling Makes Sense If:
You’re full-time RVers or travel extensively. The convenience adds up when you’re setting up camp multiple times per week.
You have mobility issues or physical limitations that make manual leveling challenging.
You frequently stay in tight spaces where precision leveling is important and there’s limited room to maneuver with blocks.
You have the budget for both the initial investment and ongoing maintenance costs.
Our Personal Experience and Recommendations
After three years of RVing and trying both approaches, here’s our honest take. We started with manual leveling and still use it as our primary method. For our style of travel – mostly weekend trips and occasional longer adventures – it works perfectly.
That said, we recently upgraded to a rig with factory-installed auto-leveling, and we’re slowly becoming converts. The convenience is real, especially after long driving days or when setting up in the rain.
Our current approach? We still carry our manual equipment as backup, and we’re glad we learned on manual systems first. Understanding the basics of leveling makes you a better RVer regardless of what system you ultimately use.
For most new RVers, we recommend starting with manual leveling. Learn the skills, keep costs down, and upgrade later if you decide the convenience is worth it. If you’re buying a higher-end rig and plan to travel frequently, auto-leveling might be worth the investment from day one.
Practical Tips for Either System
Regardless of which RV leveling approach you choose, here are some hard-learned lessons that’ll save you time and frustration.
First, invest in a good bubble level – not just the cheap plastic ones. We use a small torpedo level and a longer carpenter’s level for different situations. Digital levels are nice but not necessary.
Second, practice your leveling routine at home before heading out on trips. Set up in your driveway or a parking lot until the process becomes second nature. This is especially important for manual leveling.
Third, document your setup process. We keep photos of our typical block configurations for common leveling scenarios. It speeds up setup and helps if you’re teaching your partner the process.
For auto-leveling systems, read your manual thoroughly and understand the maintenance requirements. Regular inspection of jacks, seals, and control systems can prevent expensive failures.
Finally, regardless of your system, always use wheel chocks and engage your parking brake. Level doesn’t mean secure, and you want your rig staying put once you’re set up.
Essential Leveling Gear for Any System
Whether you go manual or auto, every RVer needs some basic leveling equipment. A reliable bubble level is non-negotiable – we prefer the small torpedo style for quick checks.
Good wheel chocks are essential for safety. The cheap plastic ones work, but we’ve upgraded to the X-shaped chocks that don’t slide around as much.
A small hydraulic jack can be a lifesaver for tire changes or emergency leveling adjustments. We keep a 2-ton bottle jack in our outside storage – it’s handled everything we’ve thrown at it.
Don’t forget about your kitchen setup once you’re level. A properly leveled RV makes cooking and food storage so much easier.
The Bottom Line: What We’d Tell Our Past Selves
If we could go back and advise ourselves when we were first choosing our RV setup, here’s what we’d say: start with manual leveling and upgrade later if you need to.
Manual leveling teaches you valuable skills, keeps costs manageable, and works reliably in all conditions. You’ll appreciate understanding the basics even if you eventually move to an auto system.
Auto-leveling is genuinely convenient and can be worth the investment for frequent travelers or folks with physical limitations. But it’s not magic – it’s a complex system that requires maintenance and can fail.
The best approach? Learn on manual, upgrade if it makes sense for your situation, and always carry backup equipment regardless of your primary system.
Most importantly, don’t let perfect be the enemy of good. A slightly off-level campsite won’t ruin your trip, but spending two hours trying to get perfectly level might. Sometimes “good enough” really is good enough.
Whatever system you choose, the goal is the same: getting set up quickly and safely so you can enjoy your time outdoors. Whether you’re stacking blocks or pushing buttons, the destination and the experience matter more than the method.