RV Awning Fails: Hard-Won Lessons from the Road
Picture this: you’re sitting around a campsite watching someone else’s RV awning fails unfold in real-time. The wind picks up, fabric starts flapping like a flag in a hurricane, and suddenly their beautiful shade structure becomes an expensive kite. We’ve all seen it happen—and if you’ve been RVing long enough, you’ve probably been that person.
I’m not going to sugarcoat it. We’ve had our share of awning disasters over the years, and each one taught us something the manual never mentioned. From a $800 replacement in Colorado to emergency repairs using duct tape and bungee cords in the middle of nowhere, these failures became our best teachers.
The Great Colorado Wind Incident (Our Most Expensive RV Awning Fails)
Let me start with our biggest mistake. We were camped outside Colorado Springs, beautiful sunny day, maybe 15 mph winds according to the weather app. The awning went out without a hitch, and we settled in for lunch under our nice shade.
Then the mountains decided to show us what real wind looks like.
Within twenty minutes, gusts hit 35+ mph. I watched our awning fabric start doing this weird rippling thing—like it was trying to tell us something. My wife Sarah started getting nervous, but I figured the awning could handle it. After all, these things are built for outdoor use, right?
Wrong. So very wrong.
The fabric started making this snapping sound with each gust. Then came the noise I’ll never forget—a deep, resonant crack as the support arm bent like a pretzel. Our beautiful 18-foot awning became an expensive piece of abstract art in about three seconds.
$800 later and a week without shade, we learned our first hard lesson: wind limits aren’t suggestions—they’re gospel.
Wind Speed Reality Check
Most RV awnings are rated for sustained winds up to 20-25 mph, but here’s what the manufacturers don’t tell you clearly: gusts are different from sustained winds. A weather app showing 15 mph sustained winds can easily have gusts hitting 30+ mph.
We now follow the “15 mph rule”—if sustained winds hit 15 mph or gusts are forecast above 20 mph, the awning comes in. Period. No exceptions for “just a few more minutes” or “it doesn’t look that bad.”
Setup Mistakes That Led to RV Awning Fails
Our Colorado disaster wasn’t our only learning experience. Over the years, we’ve made just about every setup mistake possible, and I want to share them so you don’t have to learn the expensive way.
The Angle Problem
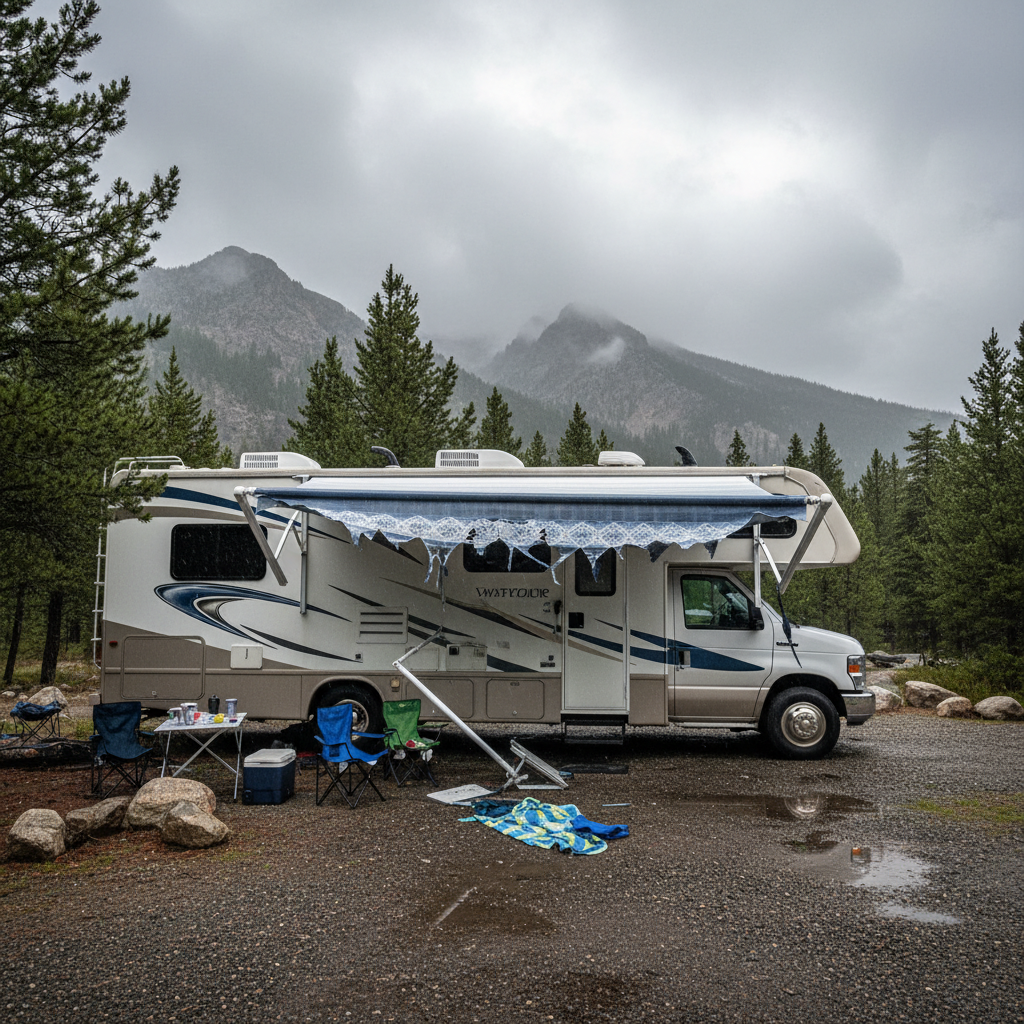
After getting our awning replaced, we thought we had everything figured out. Then came the Great Pooling Incident of Arizona.
Picture a beautiful desert morning. Clear skies, perfect temperature, not a breath of wind. We rolled out the awning perfectly level—which was our second major mistake. Around 2 PM, afternoon thunderstorms rolled in like they do in the desert, dumping about an inch of rain in thirty minutes.
Our perfectly level awning became a swimming pool. The fabric stretched under the weight, water pooled in the middle, and we watched helplessly as gallons of water sat there stretching our brand-new fabric.
The fix is simple but crucial: always set up with a slight angle for drainage. We learned to lower one support leg about 6-8 inches, creating a gentle slope that lets water run off instead of pooling.
Ground Anchor Oversights
Even with proper angling, we weren’t done making mistakes. Our third lesson came courtesy of a surprise afternoon storm in Texas.
The wind wasn’t even that bad—maybe 20 mph sustained. But we’d gotten lazy about staking down our awning because it was “just for a quick lunch stop.” When the wind hit, our RV started rocking slightly, and that motion translated into the awning fabric snapping back and forth.
No major damage this time, but watching our fabric whip around while we scrambled to find stakes taught us another lesson: every deployment gets staked, no exceptions.
We now carry four heavy-duty spiral stakes and always anchor the awning legs, even for short stops. It takes two minutes and has saved us from problems more times than I can count.
Emergency Repairs That Actually Work
Not all awning problems happen when you’re parked next to an RV dealership. Sometimes you’re in the middle of nowhere with a torn fabric or bent hardware, and you need to make it work until you can get proper repairs.
The Duct Tape Salvation
During a trip through Montana, a low tree branch caught our awning fabric and left a 8-inch tear right in the middle. We were three days from the nearest RV service center, and the forecast called for rain.
Here’s what actually worked: we cleaned the area thoroughly, then applied Gorilla Tape (stronger than regular duct tape) to both sides of the tear. Over that, we added a piece of clear packing tape to create a waterproof seal. That repair lasted six months until we could get proper patching done.
The key is cleaning the fabric first and using quality tape designed for outdoor use. Regular duct tape fails pretty quickly in sun and weather.
Bent Hardware Solutions
When support arms bend, you’re usually looking at a tow to civilization. But we’ve learned a couple tricks for minor bends that might buy you time.
For small bends in the telescoping sections, we’ve had success carefully straightening them using a piece of 2×4 as a gentle lever. The key word is carefully—aluminum bends easily but also breaks easily if you push too hard.
For bent brackets or mounting hardware, sometimes you can reinforce with metal strapping or even heavy-duty zip ties to distribute the load until you can get replacements.
Weather Monitoring That Actually Helps
After our various disasters, we got serious about weather monitoring. Not just checking the forecast, but understanding what conditions actually mean for our awning.
We use a combination of apps and on-site observation. Weather Underground gives us detailed local forecasts including gust predictions. But we also invested in a simple anemometer—a device that measures actual wind speed at our campsite.
Here’s what we’ve learned about different conditions:
Thunderstorms: Bring the awning in before the storm hits, not when you feel the first drops. Those initial wind gusts can be the strongest.
Mountain weather: Conditions change fast. What’s calm at 8 AM can be 40 mph winds by noon. We check weather every few hours in mountain areas.
Coastal camping: Sea breezes are predictable but can be stronger than forecasts indicate. Afternoon winds almost always pick up near the coast.
Preventive Maintenance We Wish We’d Known
Most RV awning fails aren’t dramatic wind disasters—they’re slow degradation that could be prevented with basic maintenance.
Every few months, we now inspect the fabric for small tears, check all mounting hardware for looseness, and lubricate moving parts. We learned this lesson when our awning motor died not from wear, but from dirt and debris that regular cleaning would have prevented.
The fabric gets washed with mild soap and treated with UV protectant twice a year. It sounds like overkill, but considering replacement fabric runs $300-600, it’s cheap insurance.
Storage Considerations
We also learned that how you store the awning matters. Rolling it up wet leads to mold and mildew. Rolling it too tight puts unnecessary stress on the fabric. We now make sure it’s completely dry before storage and don’t over-tighten the roller.
Smart Upgrades After Hard Lessons
Our failures led us to some upgrades that have made RV life much more relaxed. These weren’t in our original budget, but they’ve paid for themselves in prevented disasters.
We added an awning wind sensor that automatically retracts the awning when winds exceed our set limit. It’s like having a nervous co-pilot who never gets distracted or forgets to check the weather.
We also upgraded to a heavy-duty fabric that’s more resistant to tears and UV damage. The upfront cost was significant, but after our various repairs and replacements, it made financial sense.
The Ultimate Backup Plan
Our final upgrade was psychological: we bought a good quality pop-up canopy as backup shade. Knowing we have alternative shelter options makes us much more willing to retract the main awning when conditions are questionable.
It’s the same principle as our RV kitchen essentials—having redundancy for critical systems gives you peace of mind and options when things don’t go as planned.
What We’d Tell Our Younger Selves
Looking back at all our RV awning fails, here’s the advice we’d give to couples just starting their RV journey:
First, respect the wind. It’s invisible, unpredictable, and stronger than you think. When in doubt, bring it in. No shade is better than expensive repairs.
Second, learn proper setup from the beginning. Taking shortcuts on setup is like skipping steps in our RV winterization process—it might save time short-term, but it costs money long-term.
Third, carry repair supplies and know how to use them. You don’t need a full workshop, but basic emergency repairs can save a trip.
Most importantly, don’t let fear of failures stop you from enjoying your awning. Yes, we’ve had disasters, but we’ve also had hundreds of perfect setups that provided wonderful shade for outdoor cooking, relaxing, and entertaining.
The key is learning from mistakes—yours and ours—so you can enjoy all the benefits with fewer expensive surprises.
Moving Forward Wiser
Our awning disasters taught us lessons no manual could convey. From wind speed respect to emergency repairs, each failure made us better RVers.
These experiences connect to everything else about RV life. Just like choosing the right rig in our RV selection guides or planning routes through our slow-travel resources, awning management is about preparation, respect for conditions, and learning from experience.
We still make mistakes, but they’re smaller now. And when we see other RVers dealing with awning problems, we’re always ready to share a tool, offer advice, or just provide moral support.
That’s what this community is about—learning together and helping each other avoid the expensive lessons when possible. Because trust me, there are plenty of other ways to spend your RV budget than replacing awning hardware in Colorado.