RV Electrical Troubleshooting: Track Down 12V Power Issues
Picture this: You’re settling in for the evening after a long day of driving, and suddenly your RV electrical troubleshooting skills get put to the test. The lights start flickering like a haunted house, or maybe that one outlet just decides to call it quits. Sound familiar? We’ve been there, and let me tell you, these electrical gremlins have a knack for showing up at the worst possible times.
After five years on the road and more electrical mysteries than I care to count, I’ve learned that most 12V system problems aren’t as scary as they seem. Sure, electricity can be intimidating, but with the right approach and a few basic tools, you can solve most issues without breaking the bank on service calls.
Understanding Your RV’s 12V System Basics
Before we dive into troubleshooting, let’s get our bearings straight. Your RV’s 12V system is essentially the nervous system of your rig – it powers everything from your lights and water pump to your slide-outs and leveling jacks.
The heart of this system is your house battery bank, which stores DC power for when you’re not plugged into shore power. This connects to a distribution panel (kind of like your home’s breaker box, but for 12V circuits) that sends power throughout your rig.
Here’s what I wish someone had told us when we started: most RV electrical troubleshooting comes down to three main culprits – bad connections, voltage drops, and blown fuses. Master these, and you’ll solve probably 80% of your electrical headaches.
Essential Tools for Electrical Detective Work
You don’t need a truck full of expensive equipment to track down electrical problems. In fact, our whole troubleshooting toolkit fits in a small toolbox that rides along in our storage bay.
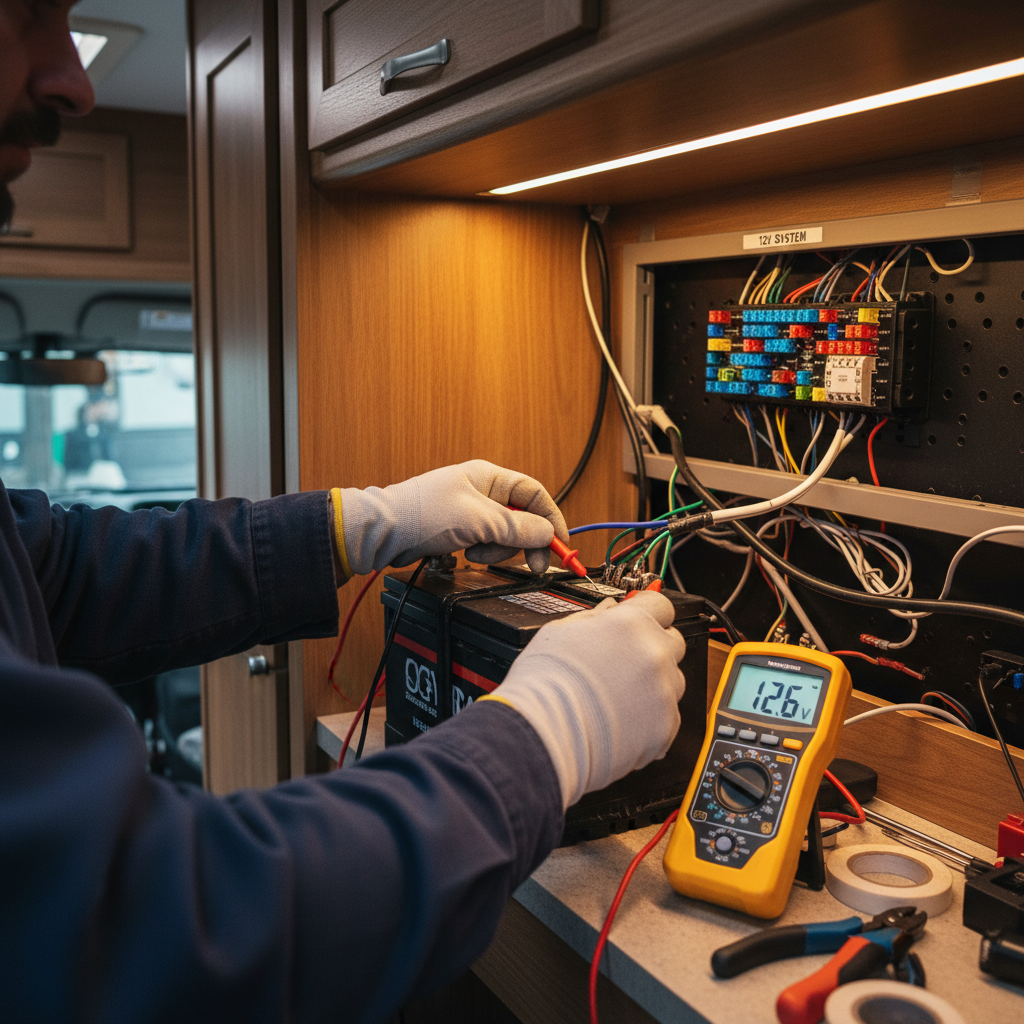
First up is a good multimeter – this is your electrical detective’s magnifying glass. You don’t need anything fancy; a basic digital multimeter from the hardware store will do just fine. This little device measures voltage, amperage, and continuity, which covers 90% of your diagnostic needs.
Next, grab yourself some electrical contact cleaner and a wire brush. Corrosion is the silent killer of RV electrical systems, especially if you spend time near the coast like we do. A small bottle of contact cleaner and a wire brush have saved us more service calls than any other tool in our kit.
Don’t forget a good flashlight or headlamp. Murphy’s Law says electrical problems always happen in the worst lighting conditions possible. Just like when we had to troubleshoot our slide-out motor during a rainstorm – having good lighting made all the difference.
The Voltage Drop Detective Game
Voltage drop is probably the sneakiest electrical gremlin you’ll encounter. Your batteries might be showing 12.6 volts, but by the time that power travels through corroded connections and undersized wires, your lights are only getting 10 volts. No wonder they’re dim!
Here’s how to hunt down voltage drops like a pro. Start at your battery terminals with your multimeter set to DC voltage. You should see around 12.6 volts on a fully charged battery that’s been sitting for a few hours. Now, work your way down the circuit, testing voltage at each connection point.
The key is testing under load – meaning with the device actually running. Turn on that flickering light and test the voltage right at the fixture. If you’re seeing a significant drop (more than 0.5 volts), you’ve found your problem area.
We discovered this the hard way when our water pump started acting sluggish. The pump itself was fine, but corroded connections in the wiring harness were dropping nearly 2 volts by the time power reached the motor. A thorough cleaning and some dielectric grease fixed it right up.
Connection Corrosion: The Silent System Killer
Speaking of corrosion, this stuff is everywhere in RVs. The combination of vibration, moisture, and dissimilar metals creates the perfect storm for electrical connections to go bad.
The worst offenders are usually ground connections. Your RV’s frame serves as the return path for most 12V circuits, and those ground points love to collect moisture and corrosion. We make it a habit to check and clean major ground connections during our routine maintenance.
Look for white, green, or blue powdery buildup around connections. This crusty stuff acts like an electrical insulator, blocking current flow. Clean it off with your wire brush, hit it with contact cleaner, and apply a thin coating of dielectric grease to prevent future corrosion.
Pro tip: take photos before you disconnect anything complex. Trust me on this one – after you’ve got everything apart and cleaned, you’ll be grateful for that reference photo showing which wire went where.
Common RV Electrical Troubleshooting Scenarios
Let me walk you through some real-world problems we’ve encountered and how we tracked them down. These scenarios might sound familiar, and the solutions are usually simpler than you’d expect.
The Case of the Intermittent Lights: Our reading lights would work fine sometimes, then suddenly go dim or flicker. After testing voltage at the fixtures, we found the problem was a loose connection at the distribution panel. The wire had worked its way loose from the terminal block due to road vibration. A quick retightening solved months of frustration.
The Mystery of the Dead Outlet: One of our 12V outlets stopped working completely. The fuse was good, and we had proper voltage at the panel. The culprit? A corroded splice connection hidden behind the wall panel. We found it by testing continuity from the panel to the outlet and discovering an open circuit halfway through.
The Phantom Power Drain: Our batteries were draining overnight even with everything turned off. This one took some detective work, but we eventually tracked it down to a partially stuck relay that was keeping a circuit energized. A gentle tap freed up the relay contacts, but we replaced it anyway during our next parts run.
When to Call for Professional Help
Now, I’m all for DIY troubleshooting, but there are times when it’s smart to call in the pros. If you’re dealing with 120V AC electrical issues, that’s generally beyond the comfort zone for most RVers. The stakes are higher with household current, and mistakes can be dangerous.
Also, if your troubleshooting leads you to suspect problems with major components like your converter/charger or inverter, those often require specialized knowledge to diagnose properly. We learned this lesson when our converter started making weird noises – what seemed like an electrical problem was actually a failing cooling fan that required internal repair.
Complex wiring modifications are another area where professional help makes sense. Sure, you can trace circuits and fix loose connections, but if you need to run new wire or modify existing circuits, having someone with proper training do the work ensures it’s done safely and to code.
Preventive Maintenance: Stop Problems Before They Start
The best electrical problem is the one that never happens. After dealing with enough midnight electrical mysteries, we’ve developed a routine that catches most issues before they leave us scratching our heads.
Every few months, we do a basic electrical health check. This includes testing battery voltage, cleaning visible connections, and checking that all fuses and breakers are properly seated. It takes maybe an hour, but it’s prevented countless roadside repairs.
We also keep a maintenance log of electrical issues and repairs. This helps us spot patterns – like that one circuit that seems to develop problems every six months, or connections that corrode faster than others. Having that history helps us stay ahead of recurring problems.
Just like the preventive approach we discussed in our slide-out maintenance guide, a little regular attention to your electrical system saves major headaches down the road.
Building Your Electrical Confidence
Here’s the thing about RV electrical troubleshooting – it gets easier with practice. Every problem you solve builds your confidence and understanding of how your rig’s systems work together.
Start small with simple issues like replacing fuses or cleaning battery terminals. As you get comfortable with your multimeter and understand how circuits work, you’ll find yourself tackling more complex problems. Before long, those electrical mysteries won’t seem so mysterious anymore.
Keep a basic electrical reference guide in your RV library. There are some excellent resources specifically for RV electrical systems that explain things in plain English. Having that reference handy when you’re troubleshooting can make all the difference.
Remember, you don’t need to become an electrical engineer to solve most RV electrical problems. With patience, basic tools, and a systematic approach, you can track down and fix the majority of issues that crop up on the road.
The satisfaction of solving an electrical mystery yourself, especially when you’re boondocking miles from the nearest service center, is pretty rewarding. Plus, the money you save on service calls can go toward more important things – like that next camping adventure or upgrading your RV kitchen setup.
So next time your lights start acting up or an outlet goes dead, take a deep breath and remember – you’ve got this. Most electrical gremlins are just loose connections or corroded terminals hiding behind scary symptoms. With the right approach and a little detective work, you’ll have your rig’s electrical system humming smoothly again.